Add an Expense on the Full Web Version [Feature]

This feature allows users to record expenses and upload receipts in order to demonstrate that CACFP/SFSP funds were spent on allowable and approved expenses.

To use this feature:
- Click on “Expenses” on the main site dashboard

- On the expense list page, click the blue "Add Expense" button in the upper-right corner.
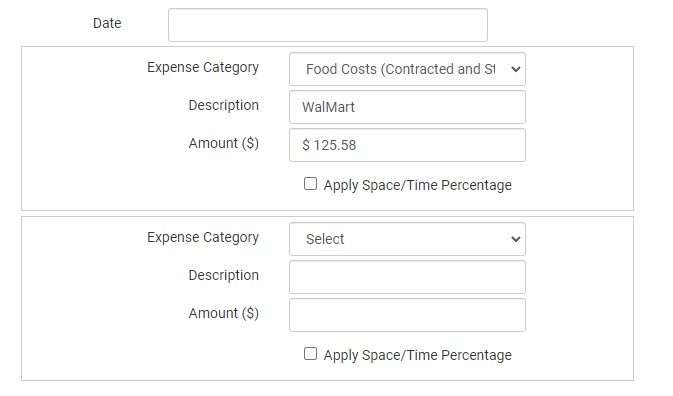
- You will see the following fields:
| Field | Description |
|---|---|
| Date | The date that the expense was incurred. |
| Expense Category | Select the category from the dropdown. The categories that are available to be selected are determined by your sponsor. |
| Description | Enter the description for the expense. Many users will enter either the name of the store at which the purchase was made or will enter more information about the items purchased. |
| Amount | This is the amount of the expense for the associated expense category. If you have a receipt or invoice that covers multiple expense categories, you will be making entries for each category. |
| Apply Space/Time Percentage | This checkbox will distribute the expense between CACFP and non-CACFP categories. For example, if you allocate rent expenses as 20% CACFP and 80% non-CACFP, then you would enter "20" as your Space/Time Percentage in Site Details. Then when you are entering the rent expense, you would check this box. You would leave this button unchecked for expenses that are not allocated (for example, a purchase of meals which is 100% CACFP). |
| Receipt Total | The amount on the receipt. The receipt total includes all expense categories. |
| Reviewed by Sponsor | Sponsors can track that they have reviewed an expense. Only sponsor users can check this box, site-level users cannot. |
| Upload Image | If the sponsor has marked this category as requiring a file, there will be a prompt for you to upload a file. |

- If you have only one expense category, you are done and you can click the green "Save" button. You will be returned to the expense list page.
When a Receipt Covers Expenses in Multiple Expense Categories
- When you have a receipt that includes items across multiple expense categories, you should click the blue "Add Expense" button.
- This provides you with a new set of fields for Expense Category, Description, Amount, and Space/Time Percentage
- When you are done entering the expenses, you have the option to click “Check Expenses Against Receipt Total” to cross-check the sum of expenses to the receipt total. Your sponsor might require you to enter the receipt total and cross-check this against the amounts in each expense category.
- You also have the option to upload a PDF or photo of the receipt.
- Click the green “Save” button and you will be returned to the expense list screen.
Entering Staff Expenses
If you select any of the following expense categories, you will see an additional drop down for "Site Staff"
- Administrative Salaries and Benefits
- Food Service Salaries and Benefits
- Labor and Benefits
- Operations Labor
You have the option to use the dropdown with site staff list OR use a description field text box. Click “Swap Entry Type” to switch options.

You can associate the expense with the individual site staff person if needed. Otherwise, you can leave it at the default option, "Staffing Expenses/No Staff Name Specified".
Entering Milk Expenses
If you select the expense category "Milk" you will see a series of additional fields.
| Field | Description |
|---|---|
| Milk Type | Select from Skim, 1%, 2%, Whole Milk, Milk Substitute, Fluid Milk. If you are doing a milk audit, you should NOT use "Fluid Milk" but instead select the fat percentage |
| Quantity | The amount of milk purchased |
| Unit | The unit of milk (ounces, cups, half-gallons, gallons) |
Expenses in the "Milk" category will automatically be transferred over to the Milk Audit.
Video Explanation