Create a Milk Audit by Day

Milk audits are done to compare milk purchases to milk usage to make sure there isn't a shortage.
There are two main ways of conducting a milk audit:
- Monthly comparison on milk purchases versus milk usage
- Daily comparison of milk on-hand to milk used
The second method is the subject of this article. This method is more rigorous because it compares the timing of the milk purchases to the milk usage.

To enter a milk audit by day:
- Click on “Milk Audit” on the main dashboard
- Select the following:
- Month/Year: the claim month for the audit
- Calculation Type:
- Calculated from Attendance: this will take the minimum portion size for milk times the number of participants in each age range and calculate how much milk you should have used.
- Food Production Amounts: this will take the usage amounts right from your food production records. Ensure that you have entered a food production record for each of the meals with milk so you have accurate amounts.
- Audit Type:
- Select "By Day"
- Click “Create Milk Audit” button.

We are now going to work from top to bottom.

First, you want to account for any milk the center had left over from the prior month. To do that, click on "Copy closing balance from prior month to opening balance" at the top of the screen

Below the button to copy the prior month closing balance is a button to filter the milk type. It can improve readability if you look at just one milk type at a time.
Next you will see a series of dates. Each row represents either:
- Opening balance
- Milk purchase (entered from expenses or entered manually, as explained below)
- Milk usage

If the center ever ran short on milk, you will see a negative number and the text will be red. If the sponsor is disallowing meals based on milk shortages, then these indicate disallows.
Below the grid of dates with opening balances, milk purchases and milk usage, you will see four additional sections
1. Milk Audit Totals by Milk Type
This provides an overview of the monthly milk available compared to the total amount of milk used. Remember that with a milk audit by day, it is possible to have enough milk for the month overall but have run short during the month. Look for red text and negative numbers in the grid above for meals being disallowed.

A manual increase lets you increase the amount of milk available for the month. You would use this feature if you are not using My Food Program to track milk expenses.
To manually increase the amount of milk available,
- Enter the date
- Select Reason: options include: Opening Balance, Parent-Provided, Purchased or Reused from Share Table.
- Select Fluid Milk Type
- Enter Amount
- Select Purchase Unit
- Click Save
That manual increase will now be added to the summary grid above.

A manual decrease will decrease the amount of milk available for the month. To manually decrease the amount of milk available:
- Enter Date
- Select Reason: options include Additional Servings or Spoilage/Waste
- Select Fluid Milk Type.
- Enter Amount
- Select Purchase Unit
- Click Save

This section is available for your recordkeeping.

Finalizing a Milk Audit
Once you are confident that the milk audit properly reflects the amount of milk available and the amount used, look for the button just below the summary grid and just above Manual Increase that says "Finalize Milk Audit"
Clicking that button will lock further editing of the milk audit.

After the Claim is Created
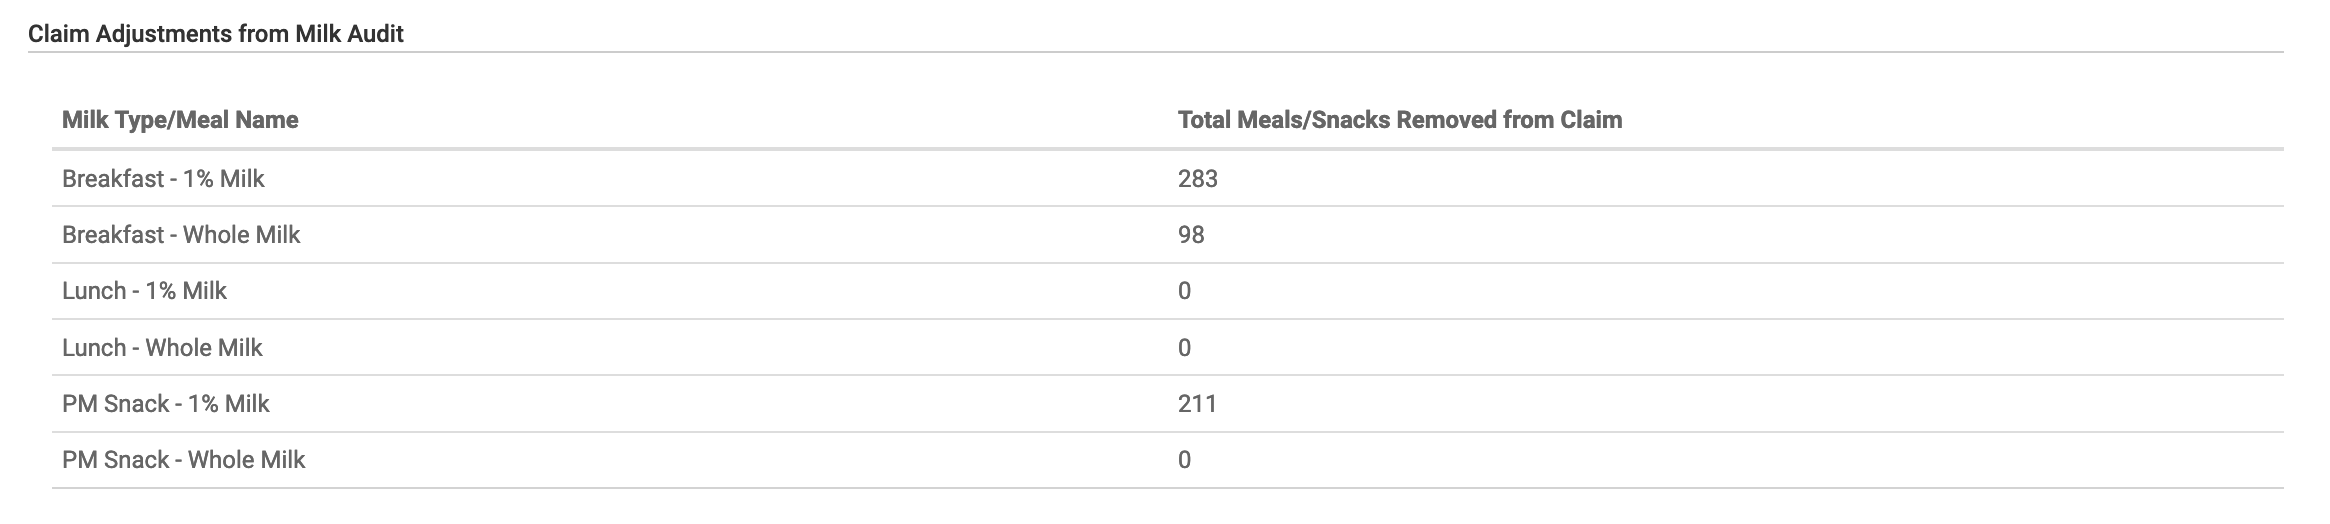
After a claim is created, if any meals were disallowed as a result of a milk shortage, a summary table will be displayed summarizing the disallows. Those disallows will also be displayed on the Disallowed Meals Report.
Video Explanation